This chapter describes the settings that apply to the whole DCP. The controls for these settings are in the DCP tab of the main window, as shown in Figure 7.1, “DCP settings tab”.
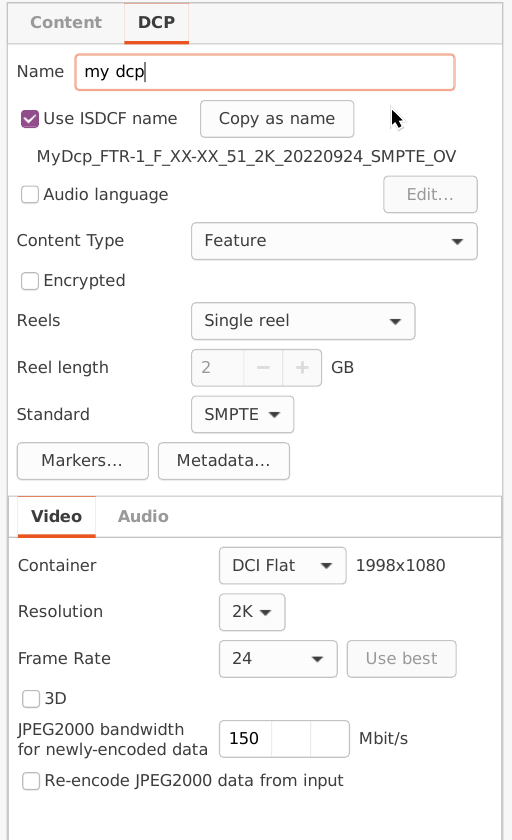
The first thing here is the name. This is generally set to the title of the film that is being encoded. If Use ISDCF name is not ticked, the name that you specify will be used as-is for the name of the DCP. If Use ISDCF name is ticked, the name that you enter will be used as part of a ISDCF-compliant name.
Underneath the Use ISDCF name checkbox is a preview of the name that the DCP will get. The ISDCF name will be composed using details of your content's soundtrack, the current date and other things that can be specified in the Metadata dialogue box, which you can open by clicking on the Metadata button.
If you want to take the ISDCF-compliant name that DCP-o-matic generates and modify it, click Copy as name and the ISDCF name will be copied into the Name box. You can then edit it as you wish. The DCP name should not matter (in that it should not affect how the DCP ingests or plays) but projectionists will appreciate it if you use the standard naming scheme as it makes it easier to identify details of the content.
The Content Type option can be ‘feature’, ‘trailer’ or whatever; select the required type from the drop-down list. On some projection systems this will affect where your content appears in the projector's server user interface, so take care to select an appropriate type.
The Encrypted check-box will set whether the DCP should be encrypted or not. If this is ticked, the DCP will require a KDM to play back. Encryption is discussed in Chapter 10, Encryption.
If you use encryption DCP-o-matic will generate a random encryption key for you. To specify your own key, click the Edit.. button next to the key.
The Reels... button opens a dialogue box which can be used to specify how the DCP will be split up into ‘reels’. See the section called “Reels”.
The Standard option specifies which of the two DCP standards DCP-o-matic should use. If in doubt, use SMPTE (the more modern of the two).
The Markers button opens the Markers dialogue, as shown in Figure 7.2, “Markers dialogue”.
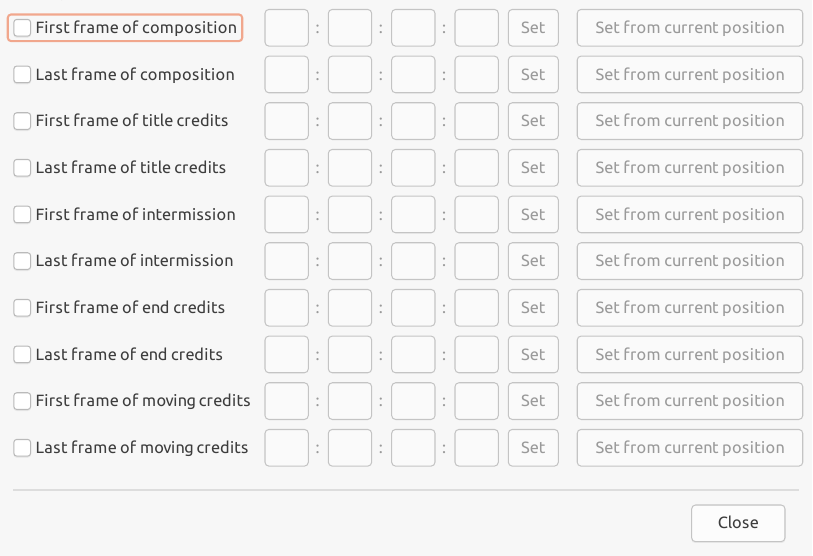
This dialogue allows you to specify times for when certain things happen within your DCP. These times may be read by projection systems to automate actions such as setting house light levels.
The Metadata button opens the Metadata dialogue, which allows you to specify various information about the DCP that you are making. Some of these data will be included in the DCP's files, and others used to make up the ISDCF name for the DCP (if that option is being used).
At the bottom of the DCP tab are a further two tabs, one each to contain the settings for the DCP's video and audio parts.
The Container option sets the ratio of the image in the DCP. If this ratio is different to the ratio used for any content, DCP-o-matic will pad the content with black. In simple cases this should be set to the same ratio as that for the the primary piece of video content. Alternatively, you might want to pillarbox a small format into a Flat container: in this case, select the small format for the content's ratio and ‘Flat’ for the DCP.
The Resolution control allows you to choose the resolution for your DCP. Use 2K unless you have content that is of high enough resolution to be worth presenting in 4K.
The Frame Rate control sets the frame rate of your DCP. This can be a little tricky to get right. Ideally, you want it to be the same as the video content that you are using. If it is not the same, DCP-o-matic must resort to some tricks to alter your content to fit the specified frame rate. Frame rates are discussed in more detail in Chapter 12, Frame rates.
The 3D button will set your DCP to 3D mode if it is checked. A 3D DCP will then be created, and any 2D content will be made 3D compatible by repeating the same frame for both left and right eyes. A 3D DCP can be played back on many 3D systems (e.g. Dolby 3D, Real-D etc.) but not on a 2D system.
The JPEG2000 bandwidth for newly-encoded data; setting changes how big the final image files used within the DCP will be. Larger numbers will give better quality, but correspondingly larger DCPs. The bandwidth can be between 50 and 250 megabits per second (Mbit/s). Most commercial DCPs use bit rates between 75 and 125 Mbit/s.
Re-encode JPEG2000 data from input governs whether or not JPEG2000-encoded data from a piece of content (usually a DCP) will be re-used in the output data as-is or whether it will be decoded and re-encoded by DCP-o-matic. If the option is enabled DCP-o-matic will decompress any JPEG2000 data it finds and re-encode it. This is useful if you want to reduce the bitrate of a DCP. Usually you will achieve better quality and quicker results by leaving this option switched off.
The Channels control sets the number of audio channels that the DCP will have. If the DCP has any channels for which there is no content audio they will be replaced by silence. You can only set an even number of channels here, since that is required by the DCI standard. If you want an odd number of channels, set the DCP channel count to one greater than you need and the unused channel will be filled with silence.
The Processor control allows you to select a process to apply to the audio before it goes into the DCP. One process is currently provided:
- Mid-side decoder — this will take a L/R stereo input and extract the common part (corresponding to the ‘Mid’ in a mid-side signal) into the DCP's centre channel. The remaining L/R parts will be kept in the L/R channels of the DCP. This may be useful to make near-field L/R mixes more compatible with cinema audio systems.
If there is spoken language in your project's audio you can tick the Language checkbox and then specify the language of that audio. This information will be used for the ISDCF name, written into the DCP cover sheet, and added as metadata to the audio MXF files in the DCP.
A ‘reel’ in a DCP is a subsection of the DCP, in the same way as a 35mm reel is a section of a film. A DCP can be split up into any number of reels and the joins (the equivalent to 35mm splices or changeovers) between the reels are seamless.
There is no reason why you can't just use a single reel for the whole of your DCP, as there is no limit to their length. Many people choose to do this.
There are, however, some possible advantages of splitting things up into reels:
- The picture, sound and subtitle data of the DCP will be split up into more smaller files on disk, rather than fewer larger files. This can be useful if the DCP is to be transferred on storage that has a file size limit. The FAT32 filesystem, for example, can only hold files smaller than 4Gb. A 6Gb DCP with a single reel could not be transferred using a FAT32-formatted disk. If that DCP were split up into two 3Gb reels it could be transferred.
- It is easier to re-use DCP components if they are in reels. Consider, for example, a film company who wants to put a 5 second ident onto the beginning of DCPs that they distribute. If they receive a feature film DCP they can modify it to add their ident as a separate reel. This is easier than attaching the picture data to the feature's existing data.
To change how your DCP will be split up into reels, click the Reels... button in the DCP tab to open the reels dialogue:

The Reel mode control lets you choose different ways that the reel breaks are decided. As you change the mode, the timeline below is updated to reflect the new setting.
Single reel simply uses one reel for the entire DCP. This is fine in most cases: select it if you are unsure.
Split by video content puts a reel break at the start and end of each piece of video content. This is useful if you want to make it easier, for example, to make VF which swaps out some credits or an introduction ident. If you have a project like the one below, for example:

you can more easily make a VF with a different ident if the ident is in its own reel.
Split by maximum reel size is useful if you want to limit how large the video file for each reel is. With this option selected you can alter Maximum reel size as required. The video files for the reels in the DCP are not guaranteed to be exactly your requested size, but they should be close.
Custom allows you to put your reel breaks wherever you like. In this mode you can right-click on the timeline and choose Add reel boundary from the menu. Once you have reel boundaries you can drag them around, or set their timecodes precisely with the controls under the timeline. You can also remove a reel boundary by right-clicking it and choosing Remove reel boundary. Ticking Snap when dragging means that the reel markers will snap to the reel markers of existing DCPs in your project, or the start position of any other content.