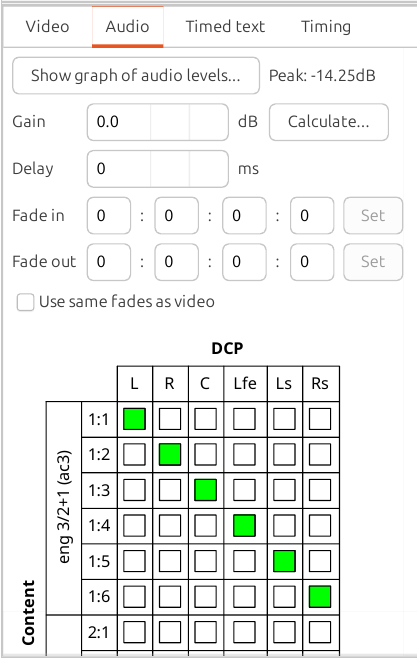
The Audio tab controls properties of the sound, as shown in Figure 6.5, “Audio settings tab”.
The section at the bottom of the audio tab is the ‘audio map’. This governs how sound from the content will be arranged in the DCP.
Down the left-hand side of the map is the list of audio channels in the currently-selected piece of content. These are labelled with two numbers; the first is the stream index within the content and the second is the channel number within that stream. Some content will have different streams for different languages or audio mixes. Along the top is each channel in the DCP. A green box means that the corresponding content channel will be copied into the corresponding DCP channel.
When content channels are copied into DCP channels the copy can be done with variable gain. If, for example, you want to copy a channel as-is, you can set a gain of 0dB. Alternatively, if you want to mix two channels into one, you may want to use a gain of -6dB on each one to prevent clipping when the two channels are added.
The green boxes of the audio mapping view tell you (very roughly) how much gain is applied to each channel. A full-height box means 0dB (i.e. unity) gain. Any less height indicates lower gain.
To map one channel to another with 0dB gain, click in the empty box and it will turn green to reflect the mapping. A second click will turn the mapping back off. To set some other gain, right-click on the box to open the gain menu. This allows you to set Off (no mapping or negative infinity gain), Full (0dB gain), -6dB gain or Edit which allows you to set the required gain precisely.
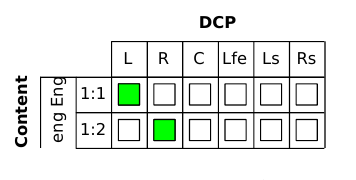
Consider, for example, the case in Figure 6.6, “Audio map example 1”.
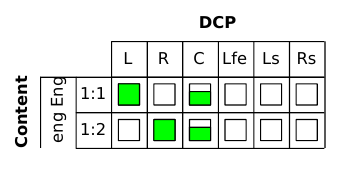
Here, we have two channels in the source which are mapped to left and right, respectively, in the DCP. The full green boxes show that the mapping is at unity gain (0dB) in each case. Imagine that we modify the settings to those shown in Figure 6.7, “Audio map example 2”
We now have the content's streams mapped to left and right and also mixed together and placed in the DCP's centre channel. The smaller green boxes on the centre mappings show that those channels are added with some non-unity gain; you can see by hovering the mouse pointer over those boxes that the gain for content channels 1 and 2 is -6dB when being sent to the centre channel and 0dB when being sent to left and right.
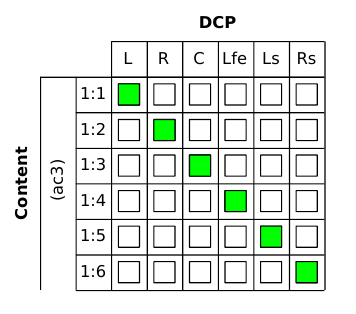
As a final example, the map in Figure 6.8, “Audio map example 3” shows the mapping of a 5.1 source into a 5.1 DCP.
Show graphs of audio levels will analyse the audio of the selected content and plot it on a graph. See the section called “Show audio” for more details.
Gain is used to alter the volume of the soundtrack. The specified gain (in dB) will be applied to each sound channel of your content before it is written to the DCP.
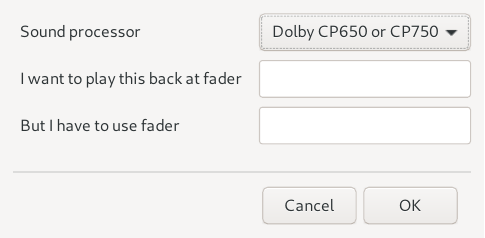
If you use a sound processor that DCP-o-matic knows about, it can help you calculate changes in gain that you should apply. Say, for example, that you make a test DCP and find that you have to run it at volume 5 instead of volume 7 to get a good sound level in the screen. If this is the case, click the Calculate... button next to the audio gain entry, and the dialogue box in Figure 6.9, “Calculating audio gain” will open.
For our example, put 5 in the first box and 7 in the second and click OK. DCP-o-matic will calculate the audio gain that it should apply to make this happen. Then you can re-make the DCP (this will be reasonably fast, as the video data will already have been done) and it should play back at the correct volume with 7 on your sound-rack fader.
Audio Delay is used to adjust the synchronisation between audio and video. A positive delay will move the audio later with respect to the video, and a negative delay will move it earlier.
Fade in and Fade out can be used to set fades for the audio. If your selected content also contains video you can tick Use same fades as video if you want the audio to fade in/out with the picture. When Use same fades... is ticked the fades used will be the ones set in the Video tab.
